Many people think that drawing is an artistic “science”, not subservient to everyone. In fact, the craving for art is awakened by a person in early childhood, but without a certain development of abilities, it weakens over the years.
So is it possible to teach a child to draw, especially if he was not given birth? When to start the learning process and from what? Finally, is it necessary to give the kid to an art school or drawing club in the future?
Our task is to promote the expression of the inner life of the student through plastic material, as well as knowledge of theoretical concepts specific to their field of action, because through artistic training it becomes a game. In addition to the plastic arts, which include drawing, painting, modeling, sculpture and other disciplines, we work with audiovisual language and photography. We learn about colors, shapes, textures, composition, architecture, various artistic methods, important artists in the history of art, and all the transversal knowledge that can be created in each class.
At what age do children start painting?
Children begin to be interested in drawing rather early, taking an example from their parents, brothers and sisters, writing something on paper. However, in a general sense, the craving for drawing is manifested in children aged 1 to 1.5 years.
And if at first the drawings of the child are more like kalyaku-malaka, then closer to 5 years (and up to 15 years), an actively developing imagination helps the kids to create real masterpieces on paper.
We learn to look, observe, recognize the multiplicity of the world, to realize the superpower of the imagination, where all beginnings are born. Seminars are multidisciplinary, with new proposals and challenges, art as a platform of knowledge. A form of unconventional, playful and relational education.
Sent to children from 4 to 12 years. Small age groups will be formed to provide personal attention. We will work to create an atmosphere of cooperation and respect that will allow us to explore our creative abilities. We will know different techniques, tools and materials.
The benefits of drawing for the development of the child
It is almost impossible to evaluate all the positive aspects of drawing in childhood - its influence on children is so huge that the development of the whole child’s personality falls under the “scope”.
In the general sense, drawing:
- forms in the child a fervent feeling of beauty and a desire to create something beautiful;
- develops the mind and imagination of the child and helps to master the new "tools" of knowledge of the world: markers, brushes, pencils;
- the child learns to transfer surrounding objects with his pictures and at the same time is engaged in useful work.
Where to start?
The first drawing lessons can take place already when the kid learns to hold objects in their hands. At this point, the mother can hand him pencils and help them draw a simple line on paper.
In this workshop we are looking for children to discover and express their abilities. Through this stimulus, you can open your intellect, provoke the need to seek answers. Drawing and painting become a motivational experience that makes it necessary to know.
The picture is useful for children, because. This makes it more efficient. It promotes expression, perception, and organization. He exercises creativity. This contributes to the expression of feelings. Serious and encouraging.
- Assistance in the development of your personality and your self-esteem.
- Promote a creative and inventive personality.
- Develop problem solving skills.
- Organize your ideas.
- It stimulates your communication.

Let it be not exactly equal and even “move out” from the album to the table. It is much more important for the child to understand that his “manipulations” can later turn into something really beautiful!
Pencils or felt-tip pens?
Giving pencils to kids without adult control is not worth it so that they do not hurt themselves at random. However, under the watchful eye of the children, children can draw with felt-tip pens and a brush - especially since they make the first samples of the “pen” using colorings.
We will explore various aspects, such as composition, perspective and color. We will move away from models of classical and modern artists, working with our works as a reference book, activating imagination and creativity. We will use different materials and methods, respecting and stimulating the expressive capabilities of each of them.
Theater as a means of expression and communication encompasses all the arts, this is in itself its own art. Theater or theatricalization allows you to use the expression as an educational event, that is, to help the subject to gain self-confidence and make him more aware of his own ability to communicate.
Who will refuse to draw the hero of your favorite book, the finished image of which lies on paper on you? It is difficult to make a mistake and do something wrong!
And which ones?
Some believe that pencils or thin felt-tip pens are not very convenient to use. At least, for kids of two years: they often break the lead, and the rod is pressed inside.
This allows us to work with different dimensions of a person: cognitive, emotional, relational and corporal. This is a complete interdisciplinary workshop. We will create spaces of play and imagination, discover new ways of being, learn to relax, trust, work in groups. It also develops language proficiency, the ability to listen and observe the group and its members, as well as adaptability and flexibility.
Recipients, participants: children from 4 to 12 years. Distributed by age group. Classes are held throughout the school year, and we finish it at the end of June. Cost of classes: one hour and a half weeks, 35 euros per month. There will be a children's approach to the instruments of the theater, through the game they will be made of imaginary and fantastic world abilities that each child carries inside. We will work with masks and puppets.
However, only by giving your child the opportunity to choose something different from the variety of options will you help him find his favorite “tool” for drawing.

Paint or crayons?
A two-year-old kid can draw almost everything: with finger paints and fat markers - on paper, with bright crayons - right on the asphalt or blackboard. It is generally most convenient to draw the latter, since they are soft, and the lines behind them leave clear.
Basically, in order to stimulate the taste for reading and its various expressive forms, we will work with exercises that will allow us to live by writing as a form of expression, knowing also experiencing a connection with other artistic forms. Our interest is that the child can develop and manifest itself from different areas.
General Content: Know and experience a variety of methods for freeing writing. Loss of fear of writing and the ability to express feelings and experiences through writing. Know different literary forms. Learn to play with words by developing our vocabulary and verbalization. Know and appreciate the world of books and words. You will learn in practical and playful ways the various processes of creating a story, from the concept of an idea, creating texts and illustrations. It will work depending on age, preferences and skills.
Mastering gouache and paint will be a little more difficult, because they assume not only the desire to sculpt anything, but also a certain technique of creativity.
Miracle of technology!
Recently, amazing things for drawing have started to be sold in shops: a set for creativity with shine on velvet paper or amazing felt-tip pens into which a kid can blow. And this is truly beautiful!
Recipients, participants: Boys and girls 6 years and older. Developed hand expressions and psychomotor development for children of primary and secondary schools. Sensory information is stimulated by the use of various materials and textures. The child learns to manipulate various objects, to interfere with various materials, thereby increasing their sensitive abilities.
Each age level has its own expression, the workshops respect the evolution of each child, and individual attention is offered. Get to know the different materials and the creative abilities that each offers. And to find that everything around us can turn into an artistic object.
Drawing lessons for kids from 2 to 4 years
Learning to draw a child who is 2-3 years old, you need to master the simplest techniques. It is very important to be attentive to the needs of the child to create and not to make fun of his diligent chirkanya pencil on paper.

The overall objective of the workshop. Encourage creativity, initiative and motivation to learn from activities based on imagination, participation and play. Establish and motivate the values and attitudes of coexistence, teamwork, integration, and tolerance among participants.
- Thus, the promotion of integral development through playful activity.
- Learn through art.
- Discover art education as a form of communication.
The indulgent attitude of adults to children's drawings leads to the fact that the child can consider drawing as an empty occupation and abandon it.
What is required?
Take bright colors, paper (the larger the sheets, the better), good brushes, a soft sponge and a glass of water. The best thing to do is to dress in something that is not a shame to get dirty - even a purchased apron for painting will not save you from stains, when the young artist is only 3-4 years old!
We will visit the exhibitions of our city, get acquainted with contemporary artists who will tell us how they understand art. Recipients, participants: focused on children from primary to future, can follow the conceptual discourse and develop their own opinions.
Comments are closed. What we show you every day, we also would like to teach you methods and resources for the development of children's creativity, a precious gift that all children have, and parents and educators are responsible for caring for and encouraging. In this regard, today we will talk about watercolors, 7 simple methods for children that you can do at home or at school.
How much time to devote to classes?
Learning to draw a child needs 10-20 minutes 2-3 times a week so that he is not tired, but the craving for visualization is not lost in the end.
Techniques for the development of drawing skills
the freedom of action
For this lesson, white glossy paper and water-color paints are taken. Let the kid dip the brush in the paint can and drip it right on the paper! Freakish patterns with which it spreads out will be similar to magic pictures!
All these creative actions are very simple, and children will love them, because they contain a certain "magic", you will see! Do you accompany me to know these ideas with watercolor? In the main image we see the classic technique, but no less effective, since children usually love them very much. The idea is to paint a thick sheet with white wax or a piece of candle, and then paint the entire surface with a dark color of watercolors. The drawing, which until this moment was almost invisible, will appear before the eyes of children as if by magic.
Watercolors, equipment for children
It can also be made on other surfaces, for example, on an image made on a wooden sheet. This technique is interesting and interesting for two reasons: first, the children will love to see how watercolor works "magically" on the salt lines, and the second is that after it dries, our drawing is a relief! It is very simple; With vinyl glue, we paint directly on thick paper and sprinkle with abundant fine salt, removing excess. Without letting it dry, with a brush filled with watercolor, we are going to touch the lines a bit and we will see how the color is distributed over them.

Sponge but not bob
For this lesson, gouache and a large sheet of paper are taken. Let the child dip his pen in the paint and squeeze it a little. Let him leave a "signature" on the sheet with his hand, and with a sponge rolled into a roll, will complete the final artistic "touches" alongside.
We let it dry for at least two days, and we will have ready-made embossed designs. It should be recognized that this method poses a high risk of staining and chaos, but with the right precautions we guarantee pleasure. We are talking about filling out some sprayers with watercolor and giving them to the children to paint. As we see in the photo, it would be ideal to do it in the summer, in the garden or on the terrace, in a bathing suit or in old clothes.
This little experiment will enjoy the little ones. We must paint in watercolor on a thick sheet, using enough water to soak it well. Then pour some salt on top. We will see how the salt absorbs water, forming these strange patterns. As soon as it dries, wipe off the salt.
Similarly, you can draw on paper and fingers: dilute the gouache with water so that it turns into a “sour cream”, and pour it on a plate. Using a wide brush, apply paint to the baby's fingers and ask to leave your autograph on the sheet.

Wet style
A thick and large sheet of paper needs to be wetted under water for a couple of seconds. Now put it on a tray and have your child paint on it with watercolor. Given the state of the surface, the paint will spread on it, mix and create amazing "wet" drawings.
Especially with young children, the study of forms and textures is the basis of this type of activity, and this method is ideal for this. As in the previous case, you should paint on a thick sheet with watercolors, make sure that there is enough liquid on the surface, and then take a plastic bag or some kitchen wrap and make a roll with it, beating On a sheet. We will see how plastic leaves very specific traces.
We'll teach you a little more creative tricks for kids this time. Among them was the opportunity to paint in watercolors, using straw to strike at it, and so that the color “went” on the sheet. At the time, we explain how this is done. Watercolors can be used not only on paper. Some time ago we show you that this is done with air-dried clay, and then painted with watercolor. Being porous, the clay absorbs color just like paper, but dries much faster.
Little flower scarlet
To teach a child to draw something really memorable, you can do this: dip a child's finger in green and, holding his hand, hold the stalk with him on paper. In the role of a bud palm hand imprint, and in the end you get a wonderful flower!
 This technique can be successfully used for the image of other objects. Try to depict with her help with the baby a tree or a cheerful giraffe.
Do you like these creative tricks with watercolor for kids? Strategies to stimulate drawing in students of early childhood. Early childhood teachers, in an effort to help children develop as independent and successful beings, ask questions when it comes to stimulating their creative or creative abilities in the classroom. The paper attempts to answer some of the most common questions, so it offers teachers a number of pedagogical strategies to improve the use of drawing in primary education students.
The study is based on a documentary review of references related to the problem raised and the author’s experience in the field of study. The main pedagogical actions are described with the support of the theory of Dr. Edwards. The importance of the work is to simplify the strategies that the teacher must follow in order to guarantee children the pleasure of drawing as a natural tool for expression.
Drawing lessons with children over 4 years old
Four years of age - this is a fertile time for the development of more complex drawing techniques. Already during this period it is worthwhile to give the child to an art school, but if you cannot do it for some reason, you can teach him to draw himself.
Together fun
Get ready for the fact that this will have to be done together, since it is from your drawings that he will begin to take the correct example. Try to draw brightly, specifically and not be distracted by too small details.
Tell about everything
Accompany the drawing process with a fascinating story so that the child understands what you are doing.
Master the figures
The most important thing is to teach the kid to draw geometric shapes that will become the basics of the desired images, regardless of whether it is an animal or a human being.
How to draw a tree?
At the age of 4, we should start with a simple one: with the usual green Christmas tree, which is cold in winter.

Below we enclose step-by-step instructions for creating an “artistic” tree and a picture - so that the child understands the principle of work.
- We draw on the sheet the line leading from top to bottom. We draw from it a little curved lines that will be branches of our Christmas tree.
- Now we will try to “describe” these lines with needles: as shown in the figure. When all the branches become fluffy, paint the herringbone in green.

Similarly, birch and other types of trees can be depicted.

Learning to draw animals
We draw a hedgehog
- Draw a hedgehog needle on paper using a zigzag, and then add ears to it.
- Connect them with an oval to make a head.

- Draw a hedgehog nose, eyes and mouth and reward the hedgehog belly.

- Draw him legs and pens.

- It remains to draw the needles as shown in the picture. Hedgehog ready!

We draw a donkey
To portray on paper a donkey is also much easier than you thought.
Gradually perform the following actions:
- We draw on paper a simple oval, then divide it with a line into two parts, at the top of which we draw a donkey's eye, and at the bottom we draw the nostrils and the mouth.
- Now we attach the donkey ears, drawing two “cucumbers” on the sheet. Just below the head, we depict another oval - this will be the donkey's torso, which we will connect with the head with two “neck” lines.
- Now you need to add the animal legs, having attached them to the bottom of the body, and a real tail, placing it on the side.

The donkey is ready! It remains to paint it as prompted by fantasy!
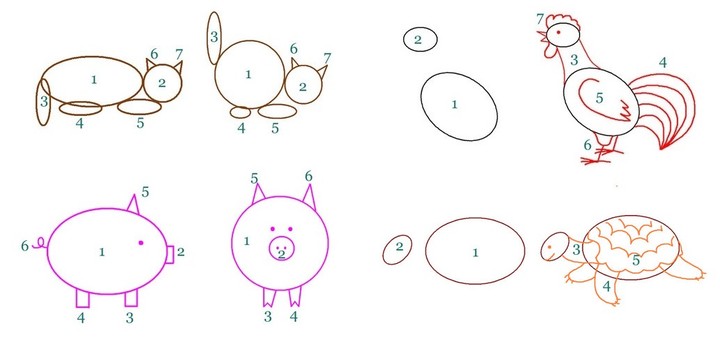
We draw a cat and a dog
In the same way you can draw a cat and a dog. The step-by-step technique of cat imaging is shown in the following figure:

The main thing is to make the child understand that drawing animals is not difficult if you take geometric figures as a basis (in this case, these are circles and semicircles) and show a bit of imagination.
In the same way you can draw a dog:

How to draw a man?
How to teach a child to draw a little man? Not as easy as you want, but not as difficult as it seems. Getting started!
The scheme of the image of a man in full growth
1. Draw an oval and a rectangle on a sheet (as shown in the picture), and then attach them with a line to each other. We finish the little man's legs and handles with fingers.

2. Then add two lines to your hands so that they appear thicker. Do the same with the legs. Now we draw the person ears (two semicircles on the sides) and do the hair.

3. A person’s face deserves special attention, but drawing its features — mouth, nose, and eyebrows — will be easy if you look at the drawing before it. Add a neck to a person and draw a shirt with a collar.

5. We draw him pants and shoes, draw hands. All that remains is nothing: to erase the auxiliary lines, to trace the outlines and to decorate the person.

Draw a human figure in motion and face
Similarly, you can portray a person in motion or draw his portrait. The step-by-step process is detailed in the following picture:

The drawing circle: when and why?
By age 6, a preschooler who is actively involved in drawing already knows how to create with paints and pencils. If his drawings are significantly different from the creativity of their peers (for the better), give the preschooler to the circle so that an experienced teacher will continue to study with him.
To choose a good circle, just find out if there is a private school or House of Creativity in your area. Very often, ordinary drawing teachers conduct similar classes right in schools (no age limit).
Individual lessons
If you want a child to be working professionally at the age of 6, give it to individual lessons. Their advantages are that:
- the teacher visits you at a convenient time;
- you choose the program for which the child will be trained (for example, drawing portraits);
- lessons are paid on the fact of occupation.
Individual lessons also have disadvantages: they are expensive, and finding a good teacher is not easy.
Summing up
Any way of teaching a child to draw is good - both at 1 year and at 5 years old, because it develops the imagination and allows you to spend a little more time with the baby.

It is not so important whether you will strictly follow some method or develop an individual artistic program yourself. It is important that these activities interest the child and be diverse.
And even if a real artist does not grow out of your child in the future, drawing lessons will still have a positive effect on his development and the correct perception of the world around him.
If your child gets upset from time to time, saying, “I can't draw it” or “it didn't work out nicely”, leave attempts to draw on a pattern, as they do in various drawing circles, and try spontaneous drawing techniques, not standard ones.
We offer you 20 OPTIONS of similar techniques, revealing.
Mats.
This is when baby kalyaki-malaki are inserted into a sheet with a cut out of some form. Those. cut out a pattern, for example, butterflies and put it on top of a baby's “drafting”. As a result, the work of the child forms a unique pattern of butterfly wings.
Drawing feet.
Secure a sheet of paper on the floor with tape. Put a pencil between your toes and ask for something to draw. You can create at the same time with two feet on one sheet of paper. Attach a large piece of paper to the wall and have the child draw something on his back on it.
Frottage.
A sheet of paper is placed on a flat relief object and then, moving not sharpened colored pencil on the surface, you get a print that mimics the main texture. It is possible to rub a pencil crumb in the same way on a relief surface. Who tried to draw on a table with a relief coating knows how this drawing technique can be included in the drawing completely unsolicited. And you can create drawings combining the relief of several objects.
Air paints.
To prepare the paint mix in a small cup:
- one tablespoon of “self-rising” (pancake) flour is flour with baking powder added. You can simply add to the flour (500 gr) 1ch.l. soda and 1 tsp citric acid
- a few drops of food coloring,
- one tablespoon of salt.
Then you need to add a little water to give the “air” paint the desired consistency.
Apply the paint should be on a thick sheet of cardboard (if you do not have the right brush, you can use cotton buds).
Attention! Cardboard should not contain synthetic materials and films, use plain cardboard or very heavy paper.
Put the picture in the microwave, turning on the maximum mode for 10 - 30 seconds until the paint is dry. Drying time depends on the thickness of the paint layer and its consistency.
Marble paper.
Looking for: cream (foam) for shaving, watercolors or food colors, flat plate for mixing shaving foam and paints, paper, scraper.
Work plan:
- Apply the shaving foam on a plate in a uniform, thick layer.
- Mix paints or food colors in a variety of colors with a small amount of water to form a saturated solution.
- Using a brush or a pipette, drip paint of different colors onto the surface of the foam in any order.
- Now all the same brush or wand beautifully smear the paint on the surface, so that it forms fancy zigzags, wavy lines, etc. This is the most creative stage of all the work that will bring pleasure to children.
- Now take a piece of paper and gently attach it to the surface of the resulting patterned foam.
- Put a sheet on the table. You just need to scrape off all the foam from the sheet of paper. For these purposes, you can use a piece of cardboard or cover cut in half.
- Under the shaving foam layer you will find stunning marble patterns. The paint had time to soak into the paper, you just need to let it dry for several hours.
Drawing food film.
Apply spots of several colors of watercolor or gouache paint on the entire surface of the sheet. We put on top of the film and draw, slightly pressing on the film, a variety of lines. Give the paint to dry and remove the film. Draw the picture to the end with felt-tip pens or pencils.
Soap painting.
You can mix paints with soapy water and then apply patterns and shapes with a brush. When drawing soap bubbles are formed, which create the texture of colorful strokes.
Dumping.
Let the kid paint on the sheet, tilt it in different directions, and then finish drawing the blot so that you get some image. Or the child dips the brush into the paint, then puts the blot on a sheet of paper and folds the sheet in half so that the “blob” is printed on the second half of the sheet. Then she unfolds the sheet and tries to understand who or what she looks like.
Drawing on a wet surface.
The technique is very simple: moisten the paper sheet with water, let it dry for 30 seconds and begin to paint with watercolors. The paints spread out in different directions and make very interesting divorces (dawn, clouds, trees, rainbow).
Salt.
Pre-make a paper sketch. Moisten it with water with a brush, sprinkle with salt, wait until it absorbs water, sprinkle excess salt. When everything is dry, paint the missing elements and color. Salt well draw dragonflies, birds, jellyfish, butterflies, snow, smoke.
Wax.
Prepare a sheet with silhouettes of animals that you “draw” in advance with a candle. Painting the picture, the child will unexpectedly "create" images of animals.
Foam rubber or sponge.
Having dipped a sponge in thick gouache, a child can paint landscapes, bouquets of flowers, branches of lilac, apple.
A bunch of pencils.
Securely attach a large sheet of paper with duct tape. Put together colored pencils - so that the sharpened ends are on the same level. Suggest child to draw.
Crayons and starch.
Pour a little starch onto the sheet of paper and spread it evenly on the surface. Suggest your child to draw with crayons on a slippery surface. It is better to use the primary colors of the crayons so that they give you new colors.
Colored glue.
Pour the glue into the empty bottles, add to each a few drops of different colors, and you are ready to create artistic works. Paint with colored glue on dark paper using a “drip” technique.
Gauze swab.
Invite your child to dip a gauze swab into the paint and draw clouds, soap bubbles, snow drifts, ducklings, butterflies. Missing parts must be drawn with a brush or felt-tip pen.
Corn cobs.
Come up with any image. Dip the cob into the paint and roll on a sheet of plain paper. Make an imprint of a corncob tail.
Prints.
Making drawings prints dies.
Drawing dots.
The kid, by light pressure of the pencil, outlines the preliminary contour of the object, then fills the space inside it with a dotted technique, using felt-tip pens or pencils of different colors.
Spray painting.
The most important thing here is to master the technique of “splashing”. Apply gouache on a dry toothbrush with sufficiently stiff bristles, a little less than you usually put on toothpaste. The texture of the paint is slightly thicker than the paste, so water is usually not needed here. Hold the brush in your left hand with a bristle down at a distance of 3-4 cm from the paper and wipe the bristles towards you with a stick.
The multicolored splash (salute) and yellow-red (golden autumn) on a white sheet are very beautiful; white "splashing" on a dark blue background (winter landscape).
Magic balls.
Material: box cover, balls, paint, paper, brushes, water.
Working process. Place a sheet of paper in the box, apply a few multicolored or monochromatic drops of paint on it. Put 2-3 balls in a box and shake the box so that the balls roll, mixing colors, creating a pattern. published by