Before you start repairs in the bathroom, you should consider the sequence of work. Not observing the technology, you can spoil the tiles laid out on the floor if you start finishing the walls. You can also damage the tiles on the walls when wiring is required. In order for a bathroom renovation to turn out to be of high quality, you need to start it right, which can be found in this article.
Necessary materials
From the materials for the initial stage of repair in the bathroom you will need:
- Mix for mixing concrete.
- Waterproofing (roofing material, epoxy resin or bituminous mastic).
- Pipes and hoses for pipeline construction, stopcock.
- Cables of the required length and section for electrical appliances.
- Waterproofing.
Tools
The following tools will be used to carry out the work:
- Putty knife.
- Container for mixing solution.
- Scissors.
- Rule.
- Construction meter.
- Pencil.
- Brush.
Where to begin
Any work in the bathroom begins with determining the location: sinks, baths, showers, furniture.
To do this, the location of all objects is drawn on a piece of paper. The future environment of the room depends not only on your own desires, but also on the convenience of laying pipes. It is necessary to place all objects in such a way that it is convenient to pull pipes for supplying and draining water to them.
Bathroom preparation
Preparing a bathroom for renovation consists of several stages:
- Water covers.
- Dismantling of old plumbing, pipes.
- Dismantling the door.
- Preparation of all surfaces.
The first step is to shut off the water that enters the bathroom. Only after that you can dismantle all items from the room. When the room is free from unnecessary items, all surfaces are prepared.
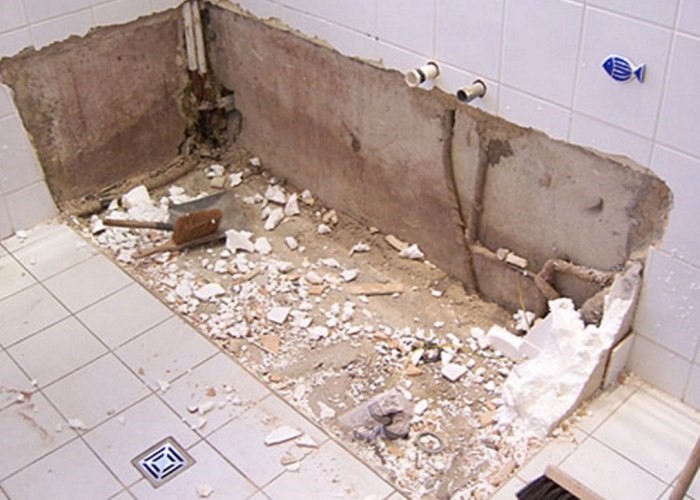
If there is an old tile on the walls and ceiling, then it must be knocked down. On the painted wall, the coating must also be removed. You can use special tools for quick paint removal. If the old coating is still poorly removed, then shallow notches are made over the entire surface of the walls so that the wall becomes rough.
Bathroom renovation. Step-by-step instruction
After the preparatory work is completed, the following actions are performed:
- A floor screed is being made.
- Waterproofing is being installed.
- A pipeline is being laid.
- Power is supplied to the devices.
A floor screed is needed to facilitate further tiling work. Due to the implementation of this stage of work, the floor is perfectly flat. In addition to leveling, the screed provides sound and heat insulation. This is especially important for those who live in a private house and on the first floors of apartment buildings.
When the screed dries, it is necessary to lay a layer of waterproofing, which will protect the floor from moisture penetration. Then the pipeline is connected to all plumbing fixtures. Water inlet and outlet is provided.
We must not forget about the laying of electrical wiring.
This is very important at the initial stage of repair. After all, it is possible to immediately make a strobe on the walls without finishing for laying cables to electrical appliances.
Screed installation
The screed is done only on a clean, dry floor. It is necessary to remove all debris from the floor so that no grains of sand remain. After that, the floor is primed with a brush. Then the mixture for the screed is prepared.
First you need to determine the curvature of the floor. For this, the building level is used. If the floor is level, then no screed is required. With height differences of 1 m 2 no more than 1-2 cm, a cement-sand mortar is made. But if the curvature exceeds 2 cm, then a concrete mixture of cement, crushed stone and sand will be required.
Concrete mixture to eliminate large height differences is prepared from cement, crushed stone and sand in a ratio of 1: 3.5: 2.5 in a concrete mixer or thoroughly mixed by hand in a large container.
After preparing the solution, beacons are installed on the floor, along the upper part of which a horizontal line can be drawn. If you put a building level on top of the lighthouses, then it should show a flat surface.
Then the prepared mixture is poured onto the floor in parts. It should reach the top of the lighthouses, but not completely. After an hour, the beacons are pulled out of the dried solution, which is why it is required that the solution does not completely cover their tops.
The resulting cracks from the beacons are filled with a solution. After that, the room is left to dry the floor. During drying, it is better to cover the floor surface with plastic wrap, due to which the concrete will not crack.
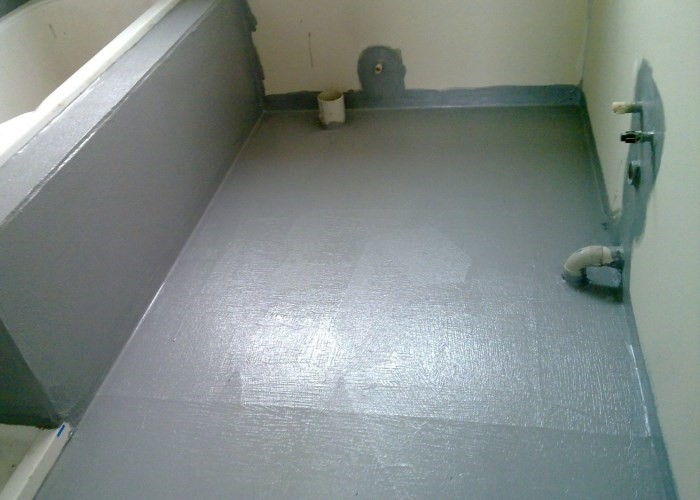
Do-it-yourself floor waterproofing
After the concrete has dried, it is imperative to make waterproofing. This is extremely important in order to protect the concrete from absorbing excess moisture.
Waterproofing consists of the following steps:
- Primers.
- Preparation of material for waterproofing.
- Application of mortar (or material)
First of all, the floor must be re-primed. When insulating the floor with liquid mixtures, priming will additionally provide better adhesion.
If rolled waterproofing is used, then it is cut into sheets of the required dimensions. After that, it is laid on the floor. Sheets of material should be stacked tightly to each other. The seams should be glued with a special tape.
When using liquid mixtures, there will be no problems with seams - the compositions lie on the floor in seamless layers.
Using bituminous pastes, you can not only perform insulation, but also level the floor.
Liquid waterproofing is applied with a brush to the entire surface. And when using pasty formulations, a spatula is used. In the first and second cases, care must be taken to ensure that the material is applied in a uniform layer.
Installation of pipelines
Installing plumbing in a bathroom is one of the most difficult tasks. The main thing in this matter is the correct drawing up of communication layouts. It has already been described above how to do it correctly.
After that, the laying method is determined, which can be:
- open.
- closed.
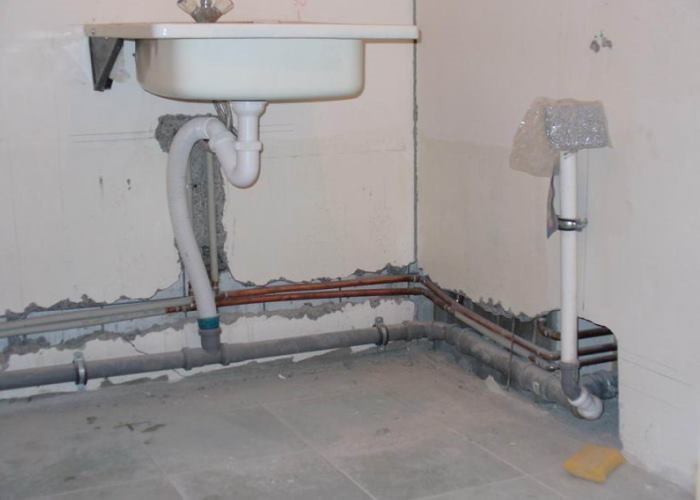
Open implies the passage of pipes along the walls from the outside. This type is less presentable than the closure type gaskets. The last option is good because all the pipes are hidden in the walls. But for this you will have to spend a lot of time, because you have to ditch the walls.
So, if an open type of installation is chosen, then all pipes are laid along the walls as low as possible to the floor. When closed, it is necessary to draw on the wall the places where the pipes pass, then to perform the gating of the surface. Pipes are laid in the prepared strobe, which are smeared with cement mortar on top.
When installing the pipeline, it is necessary to connect one of its elements to another in series. In all connections, you need to use a rubber gasket that will protect against leaks.
Serial laying will not allow the simultaneous use of several devices with good water pressure. To ensure uniform distribution of water, you can use collector wiring.
The collector type of laying implies a separate laying of pipes for each device. Due to this, a shut-off valve can be installed on each site, which will allow you to turn off the water not immediately in the whole house, but only in a separate area. After laying the line, you need to check the system for leaks.
Wiring
When laying electrical wiring in the bathroom, there are several points to consider:
- Installation of automatic switches.
- Use of 3-core cables.
- Use only protected electrical appliances.
First of all, you need to calculate the load of all electrical appliances in the bathroom. You need to add about 25% of the stock to it. After that, the devices must be divided into several groups (the load of a separate group should not exceed 1.5 kW). After that, an automatic switch of the corresponding rating is installed in the electrical panel for each group of consumers.
With an installed power of a group of electrical appliances of 1.5 kW, a 10 A circuit breaker is suitable (1500 W / 220V \u003d 6.8 A. The nearest 10A circuit breaker is rated).
Cables should be used only three-core. The 1st core is connected to the phase, the 2nd - to the neutral conductor, the 3rd - to the ground loop on the house. If there is no such circuit in an apartment building, then the core can be brought to any metal surface, for example, to the shield door.
Top tips from professionals for initial bathroom renovations:
- First of all, you need to level the floor.
- The second step is to connect the plumbing and electrics.
- It is necessary to determine in advance the location of the plumbing so that you do not have to redo it.
Performing the initial stage of renovation in the bathroom is the most difficult and responsible. Further work and the final result depend on this. Such recommendations will help to complete the rough work as efficiently as possible and help save time and material resources.