Are you planning a major overhaul in the apartment? This means that you will have to think about what is the best way to decorate the bathroom so that it is beautiful, reliable and relatively inexpensive.
I must say that the history of the operation of bathrooms goes back several centuries. Of course, during all this time, various methods of finishing such premises were tested everywhere.
Historically, some materials for cladding rooms with excessive moisture were considered impractical and impractical, while others were recognized as the best solution.
Why is this happening, and what methods of cladding to choose for this or that occasion?
Finishing work methods

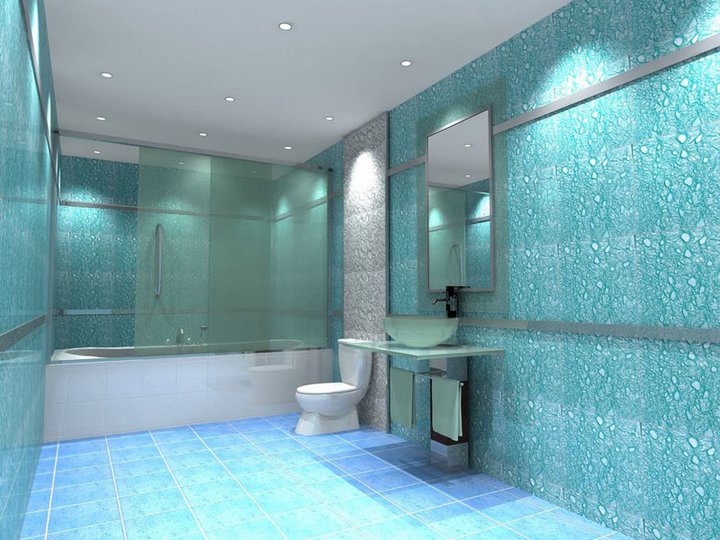
In the photo - a stylish combination of ceramic tiles with different standard sizes
Traditionally, the walls and floors in rooms with excessive moisture were finished with glazed ceramic tiles. On the walls, as a rule, tiles were installed smooth, and on the floor matte, in order to exclude the possibility of falling.
But the question is, how can you decorate a bathroom other than tiles, and are there any more original ways?
There are such methods, and among them we note the following:
- the use of liquid wallpaper;
- the use of decorative plaster;
- installation of wall panels.
Let's consider the listed finishing methods in more detail.
Laying ceramic tiles

If the question is how to decorate the bathroom so that the result is the most durable, choose ceramic tiles. Such a finishing material is equally hydrophobic and resistant to mechanical stress.
Important: When choosing a tile, you must take into account the fact that there is a floor and wall modification. The difference in this case lies in the thickness, and, consequently, in the strength of the finishing material.
In addition to the tile itself, from the materials you will need:
- special glue;
- cross-shaped plastic spacers;
- grout.
Of the tools you will need:
- a clean plastic container for mixing the glue;
- perforator with stirring attachment;
- metal notched trowel;
- medium-sized trowel;
- rubber mallet;
- water level;
- tile cutter or grinder with the appropriate disc.

The instructions for finishing work are as follows:
- We prepare the surface of the base. For this, the old coating is removed and the surface condition is assessed.
The easiest way is to tap the surface to determine the presence of voids. If there are any, the reeling fragments are dismantled and the resulting grooves are puttyed with a compound similar to that used to build the base.
Then the surface is leveled so that the level difference is no more than 1 cm.
Important: drops of more than 1 cm, if they are not leveled in a timely manner, will result in an overconsumption of glue, as a result of which the price of finishing the bathroom will increase.
- Cooking glue. The glue is prepared in accordance with the manufacturer's recommendations. The packaging contains the recommended doses of water and mixture that should be followed for best results.
Tip: We prepare the glue by pouring the mixture into water, and not vice versa. This is an important requirement, failure to comply with which can lead to a deterioration in the quality of the finished result.
- Stir the glue thoroughly until a homogeneous consistency is formed, after which we let it settle.
We lay the tiles on the wall.
- We measure 1.3 tile widths from the base of the floor and nail a horizontal plank with a length to the entire wall. We moisten the wall with water from a spray bottle and apply a layer of glue 1-1.5 cm thick with a notched trowel.
- We put the tile close to the nailed bar and press it firmly. We remove excess glue. We apply a water level to the tile and check the degree of perpendicularity to the horizon.
- If one edge of the tile protrudes forward more than the rest, take a mallet and smooth the surface with light blows.
We also install tiles around the entire perimeter of the bathroom. After that, we beat off the starting bar and lay the first row.
Important: Remember to insert spacers between adjacent tiles.
We lay the tiles on the floor. In principle, the instructions are approximately the same as for wall mounting, but everything is much simpler, since the facing material will not slide down.
At the end of the work, we grout the joints and clean the surfaces from dirt.
Laying liquid wallpaper
If the question of how to decorate a bathroom other than tiles is still relevant, pay attention to liquid wallpaper. This type of coating is an excellent solution for use in rooms with excessive humidity, since it has no seams and is therefore not susceptible to water ingress.
This coating is composed of natural cellulose fibers and a binder. The natural ingredients used in this coating are completely environmentally friendly.

Liquid wallpaper is a relief coating characterized by:
- ease of application;
- durability;
- ease of dismantling;
- hydrophobicity;
- resistance to sudden changes in temperature indicators;
- antistatic;
- resistance to mold and other microorganisms.
Applying liquid wallpaper is a multi-stage complex work. At the initial stage, the surface is leveled, cleaned, dust-free, primed and dried. While the surface of the walls dries, you can start preparing the solution.
It should be borne in mind that one standard package of the mixture weighing 1.7 kg is consumed for 5 square meters of the wall with a layer thickness of 1-2 mm.
The mixture is prepared as follows:
- the contents of the package are poured into a clean plastic container;
- in addition to the main components, coloring additives are added to the solution;
- everything is filled with 6-8 liters of cold water;
- the contents of the container are thoroughly mixed until a solution with a homogeneous consistency is formed.
Application of liquid wallpaper is carried out with a spray gun or a traditional short-nap roller. It should be painted with a roller in several directions in order to provide a greater relief of the texture.
After complete drying (on average it lasts 2 days), such wallpaper can be cleaned and even washed. However, do not forget that such a coating practically does not attract dust, and therefore caring for them is simple and will not take much of your time.
Application of decorative plaster

In the photo - decorative plaster
Decorative plaster is a wide range of modifications, among which you can choose moisture resistant options that will be an excellent solution for the bathroom. The application of decorative plaster requires experience from the performer in carrying out such work.
There are two types of decorative plaster: textured and structural. Textured plaster is a non-uniform granular plaster mass, to which various fillers are added, such as, for example, small pebbles, wood fibers, etc.
Structural plaster is a synthetic latex based coating based on a mixture of cement and lime or potassium silicate.
The use of decorative plaster has a number of advantages over other wall coverings.
Among these advantages, we note the following:
- ease of application;
- excellent appearance of the finished surface;
- simplicity and convenience of regular maintenance;
- the ability to select the optimal color performance in relation to the interior of the bathroom;
- resistance to sudden temperature changes and high humidity;
- reliability and durability;
- acceptable price.
Other methods
In addition to the listed finishing methods, there are other equally popular and relevant methods. All of them are united by one property, namely, immunity to excessive humidity in the room, which is very important in relation to the decoration of bathrooms.
For example, made of PVC or film faced plywood. It is not recommended to use wall panels made of chipboard and OSB, since these materials do not differ in sufficient hydrophobicity.
Output
As you can see, bathroom decoration can be done by hand. The main thing is to purchase the highest quality materials that you can afford.
In order for the repairs in your apartment to be successful, use the information provided on our portal. And to make finishing in the bathroom easier, watch the video in this article.